 Mobile
 Tower
Tower
 R24
R24
 Builder
 Manager
 Connect
 Kyno
Kyno
 Media Engine
 Remote Access
 Support
A few summers ago, we received a call from Light Sail VR about a hugely ambitious project they were undertaking called Speak of the Devil. Their plan was to create the first ever immersive, interactive, live-action horror experience, and they were going to shoot it in the woods ninety miles outside of LA. It sounded like a logistical nightmare from pre-production to post-production (which it was), but if anyone could pull it off it’d be Matt & Robert. They got Google on board so we figured we could lend them a OWC Jellyfish or two to work from on-set and throughout post.
What we asked for in return was that LumaForge could embed someone on-set and during post to document their workflow so that the rest of the world could learn from this project. If live-action and narrative VR is going to succeed then the process for creating it needs to get keep getting simpler so that our energy can be put toward storytelling. Our hope is that this case study will encourage other creators to share their processes and push this entire art form forward.
THE DELIVERABLES
- Create an immersive, interactive live action narrative.
THE SOLUTIONS
We’ll let Matt Celia give you the play-by-play of how they actually tackled this. His generosity in sharing the details of their process will undoubtedly give you an advantage!
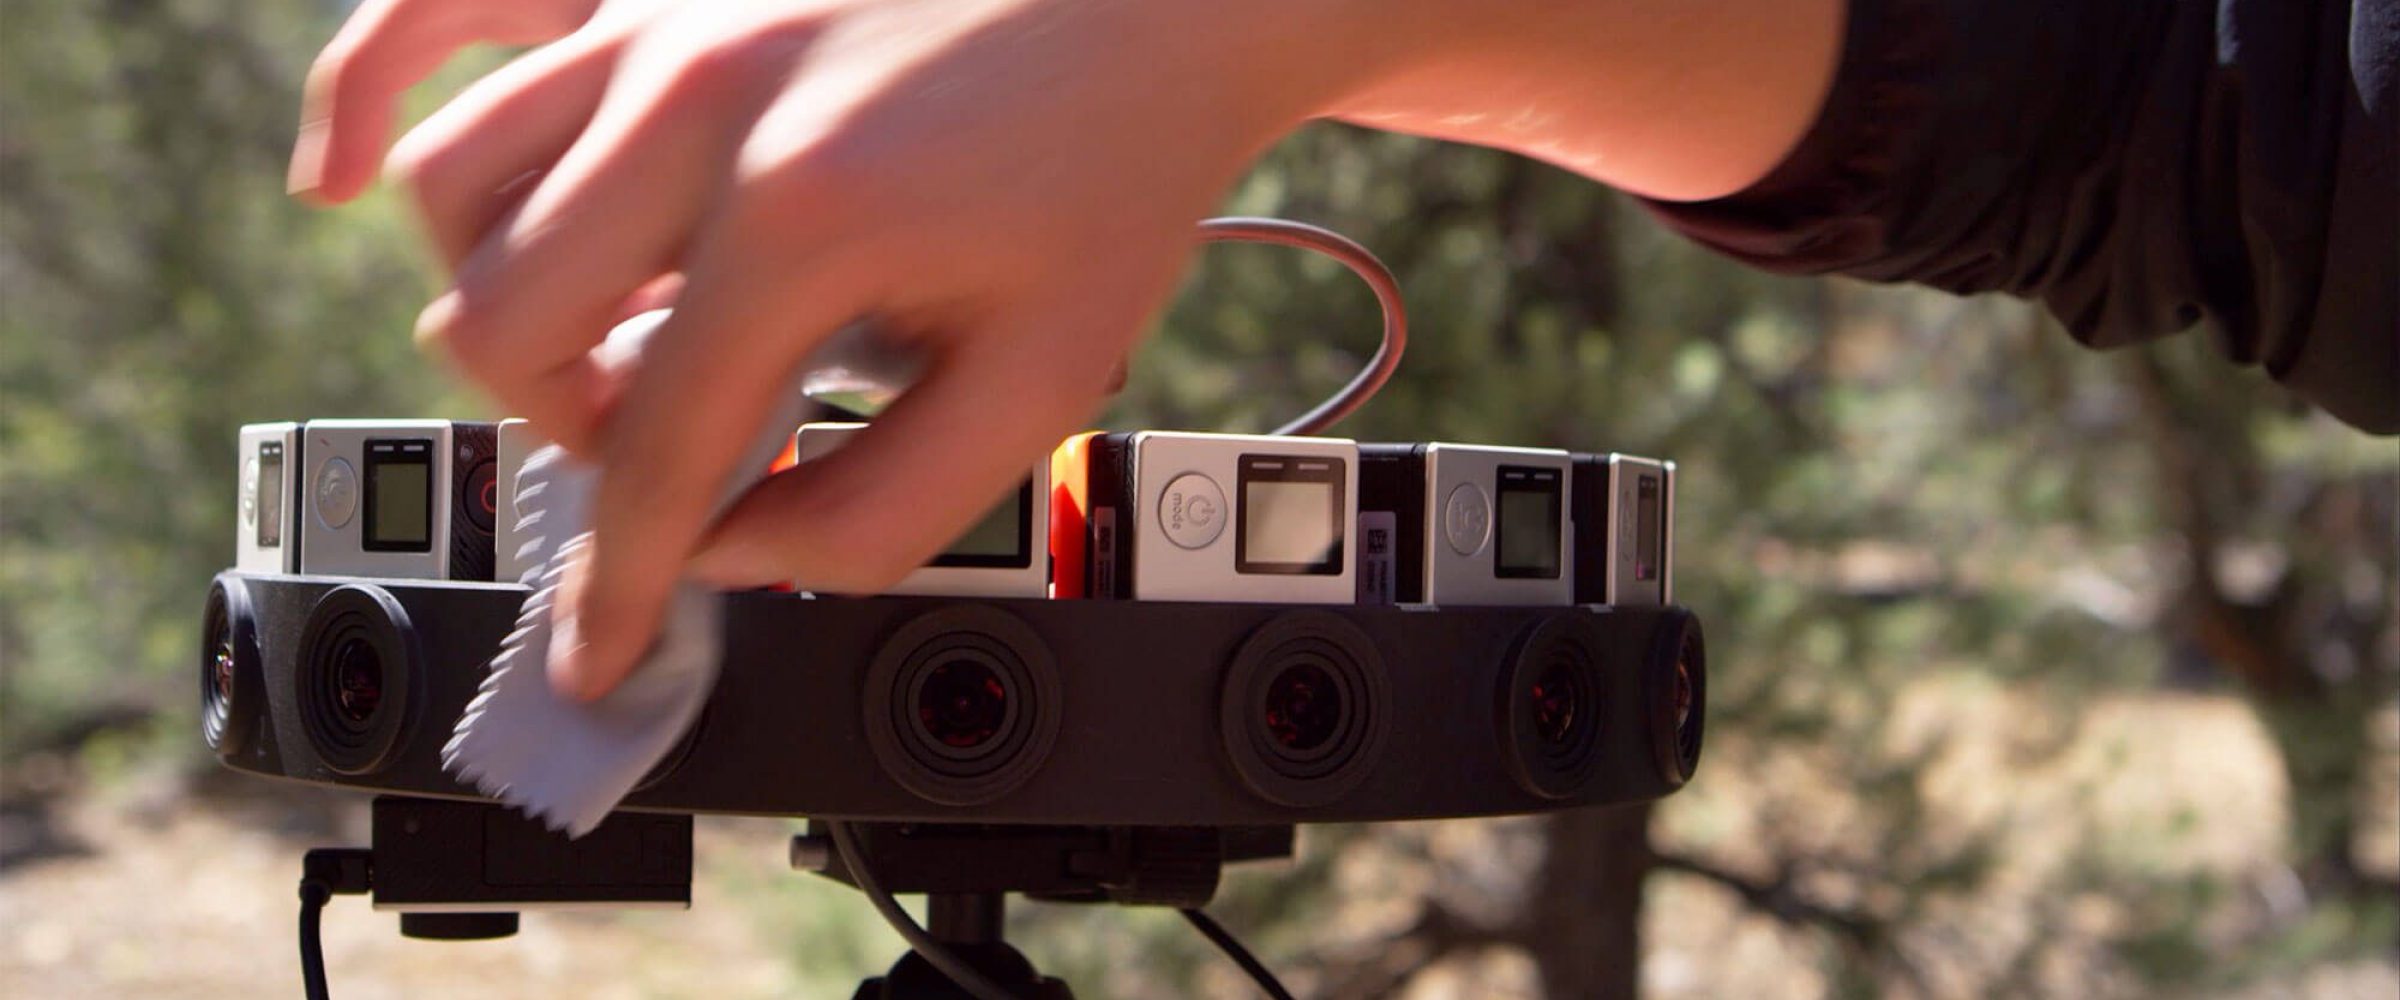
“We filmed over the course of four days using the GoPro Odyssey camera as part of the Google Jump Start program. The camera and the stitching required to turn 16 GoPro cameras into 5.7k stereoscopic 60fps media were all provided by Google. We had 56 individual locations to cover and often several scenes within each location. By the time we finished, we had 122 unique scenes.
Each scene consisted of several components. First, we had the performance scenes with our actors, which we would rehearse several times and then film a few variations until we got a take we liked. Second, we had to shoot a loopable scene so that when our characters left, we would be able to let the audience hang out in that location until they decided they wanted to move in a different direction. For both creative shots, we had to shoot a clean plate so that we could remove ourselves from the shot by joining the two shots together in the edit. We also captured a camera for the top and a plate for the bottom, as the GoPro Odyssey is a cylindrical 360 rig and we wanted to composite in the entire 360 sphere.
All in, we were shooting about 1.5TB of compressed h.264 footage each day. The total run time of footage to be stitched was around eight hours. Thanks to YouTube Space LA, we were able to use their gigabit connection when we returned from Big Bear Lake and spend the next 36 hours uploading everything to the Google Cloud Platform where it was stitched and then ready for download. It only took the cloud about 36 hours to stitch every single shot, and then it took us another 36 hours to download it.
The footage we get from Google consists of 5760x5760 h.264 files with a 4:2:2 colorspace. It’s tough to play that kind of footage back, so we discovered that if we transcoded to cineform it was much easier and more stable to work with. Of course, that comes with the cost of much larger file sizes.
Editing a project like this required us to think in siloed scenes. Each scene (even the loops) became mini-projects, requiring a full post pipeline for each one. The worst part was not really being able to understand how it all fit together until we could put it in the game engine. Creatively, it was hard to make certain calls until much later in the process because this wasn’t a linear narrative.
As soon as we had rough locks on our scenes, we starting bringing in video to the Unity game engine. After prototyping a few scenes myself, I realized that in order to optimize this on a level that would work on mobile phone platforms such as Daydream or GearVR, I was going to need some serious coding help. After all, we estimated that we would have around 8GB of final h.264 video clips to serve. It needed to be streaming.
That’s where our collaboration with Wemersive and The Oberon Group came in. Wemersive is one of the best 360 video streaming developers out there and they hired on Morgan Carlson from The Oberon Group to handle the Unity integration. What we didn’t expect was that Morgan would be so willing to go above and beyond and help develop an entire interactive video toolkit. By creating a toolset, I was free to swap videos, change logic, and see how this narrative was going to shape up as we moved forward throughout the post production pipeline.
After we declared a picture lock on the footage, it was time to get back to the full quality files and do our VFX finishing work. To do our final compositing, we output each layer of our locked cut (the equirectangular that has merged with our clean plate, the top cameras, and the bottom camera plates) as a frame sequence since Nuke prefers frames over QuickTimes. The bonus here also is that if a few frames aren’t correct, we didn’t need to re-render the whole thing.
Since we had so many scenes to work with, we needed help. We hired Jeremy Vanneman from Treehouse Studios in Texas to help us out. Since we didn’t want to sling these huge files back and forth, we decided to send him still frames and let him do the stereo compositing in Nuke and then send us the Nuke script to reconnect and render with the full quality files here in Los Angeles.
Once the Nuke renders were complete, we brought the footage into Scratch for the color grade. One of the unique aspects of this project was the fact that every single shot was filmed with the same orientation of true north. We actually had a compass mounted to our camera rig during production! We did this because we wanted to maintain the true geography of the location in the finished experience. The problem this presented was that we needed to be able to use a coloring tool that is 360 aware and can handle window grades across the seam line for when our action takes place to the south of us. Luckily, Scratch has built an incredibly powerful toolset for VR filmmakers to use.
Meanwhile, our audio mixer Eric Wegener is cranking out finished spatial audio mixes for each of our 122 scenes. It’s a ton of work that not only involves working with each scene, but also thinking about all the other “game” elements in this interactive narrative. Eric created a base ambient audio layer that would play throughout so that we would never have a silent moment. As certain scenes occurred that would move the narrative forward, it would trigger a more tense version of that ambient sound bed. He created four different footstep sounds that would trigger randomly between scenes so that we could cover the time it takes to load all this video with something that keeps you present in the world. He created UX sounds for the menu and when you pulled out the map and compass. He also created a series of randomized one shots consisting of babies crying, wolves howling, eerie wind, twigs breaking, etc that would trigger at a random interval once the demon was summoned. All of this incredible audio helps make the sound of the piece truly organic and terrifying at the same time.
Serving up that audio in the game engine is a huge undertaking for a CPU that would already be at the limit of power just handling the video alone, so we decided to pre-render all of the spatial audio tracks into a quad-binaural format.
We spent the last few months of the project putting all the pieces together, which required a lot of oversight and refinement. On the video end, we needed to make sure each composite was perfect. On the development end, we had tons of bugs and performance issues to solve. It was incredibly difficult because to our knowledge, nobody had ever attempted a multi-video interactive project on this scale before for mobile devices. There was a lot of trial and error.”
-- Matt Celia, Creative Director at Light Sail VR
THE OUTCOME
On February 13th, they shipped the first public version of Speak of the Devil on the Google Play store for Daydream compatible phones. It will be rolling out to other platforms over the next few months!
"Looking back, this project wouldn’t have been possible without a central storage server. Enabling all of our computers to work on various parts of the pipeline and access the storage in a reliable, fast way, meant that was one part of this workflow we never needed to worry about. It just worked. And when we needed to rethink parts of our workflow, we had plenty of storage available to try new techniques. I can’t imagine trying to do this on a sneaker-net of drives. With the amount of data and performance VR productions on this scale need, we were incredibly thankful to LumaForge for being awesome partners and helping us bring our vision of ground-breaking cinematic VR to life."
Matt Celia, Creative Director at Light Sail VR